DIY Outdoor Couch

Thank you to Dave for not only writing this (very detailed and time consuming) DIY outdoor couch tutorial, but more so for taking my Pinterest and Restoration Hardware-style visions and turning them into a one-of-a-kind reality. Hope you enjoy his post and if you have any questions for him, be sure to leave them in the comments below!
DIY Outdoor Couch
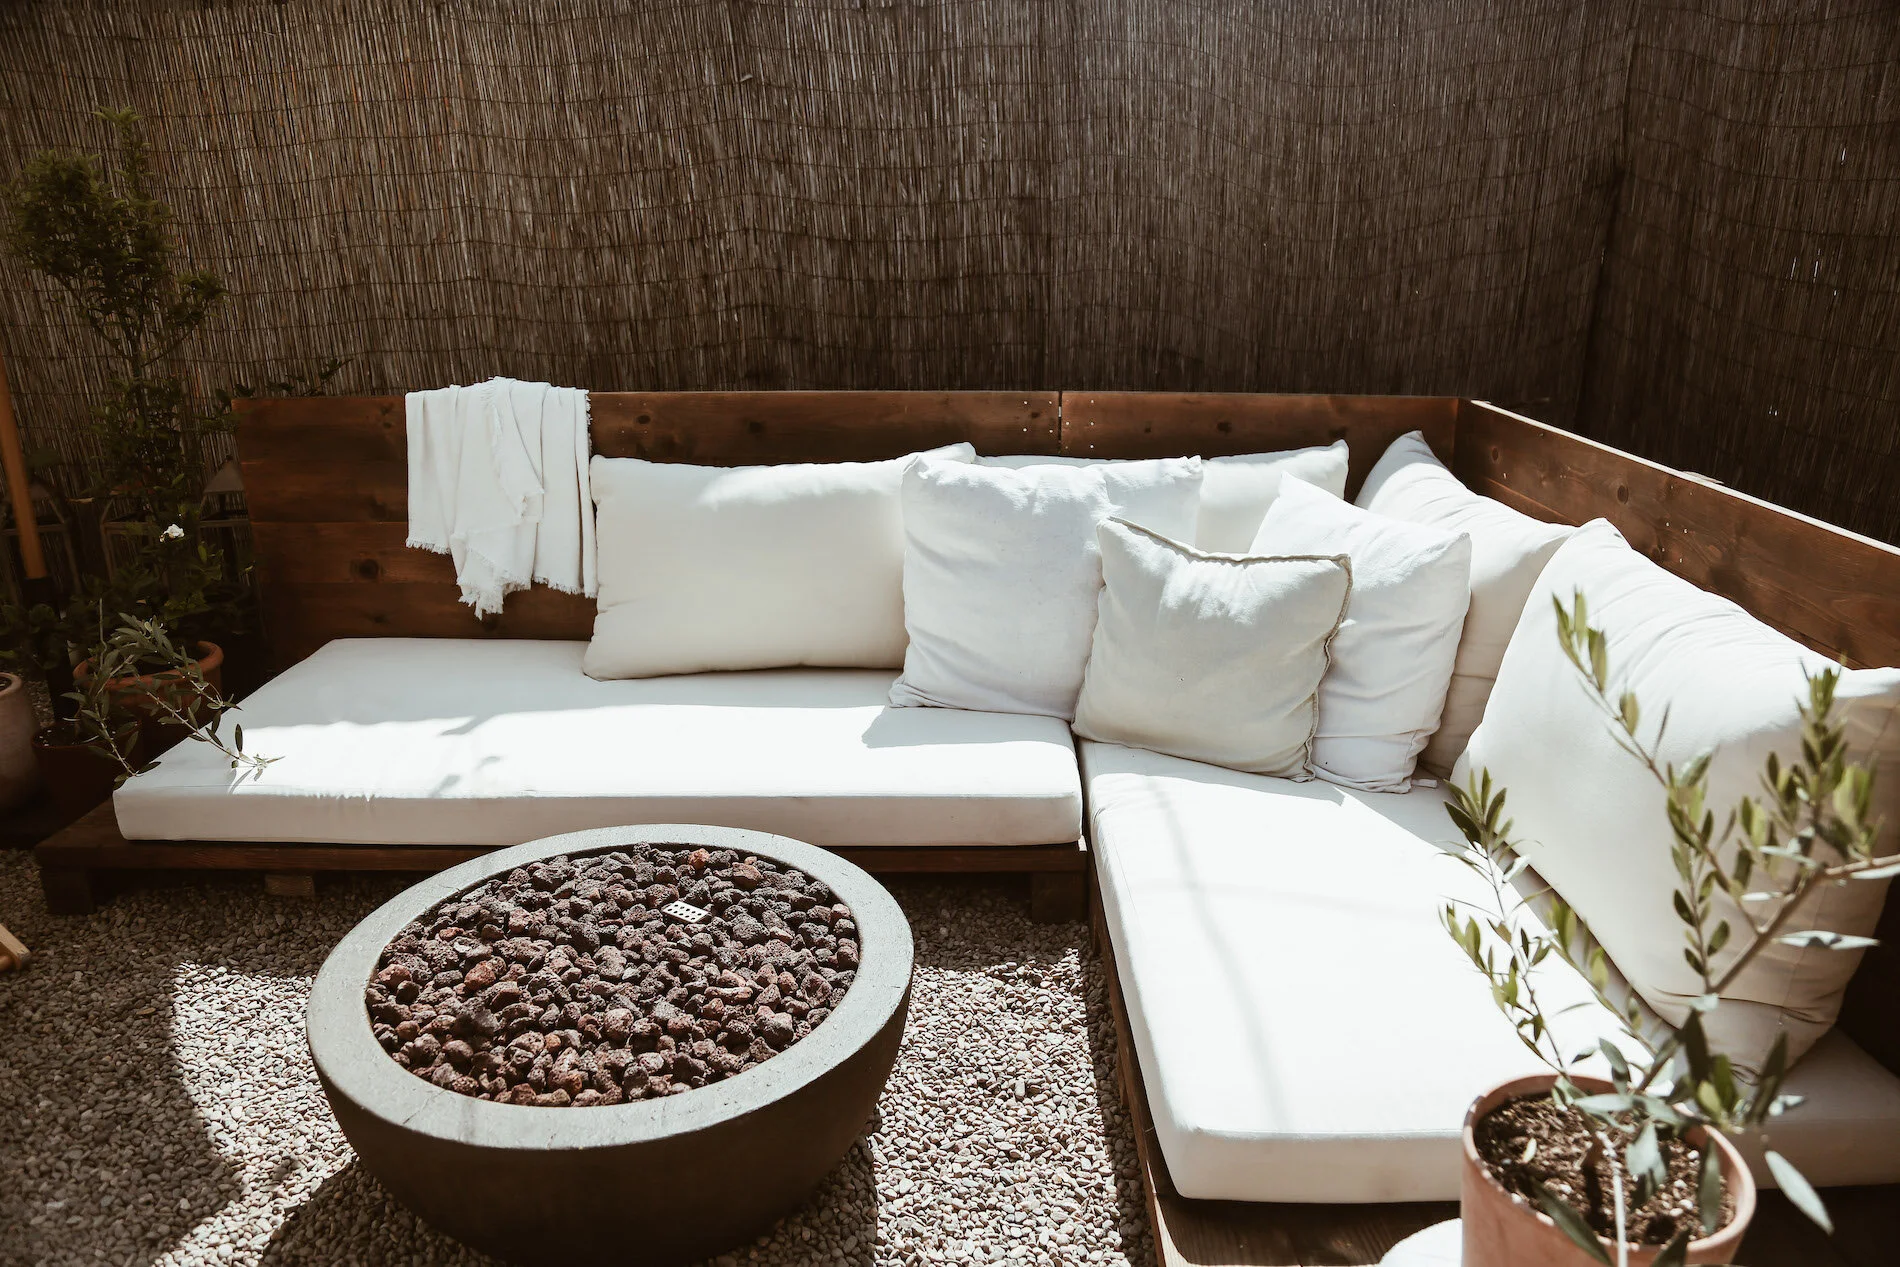
A picture can be worth 1000 words.
In this case it was worth 1000 hours and many more of outdoor enjoyment in our backyard.
Ever since we moved to California, one thing that was always high on our list was outdoor space. I mean, in Southern California, your outdoor space is really an extension of your indoor space with the way the weather can be pleasant year round compared to many other places in the country.

Moving into our little bungalow in Venice was no exception to the rule on the outdoor space, and when we saw the potential for what we could turn it into, we instantly envisioned many days and nights sitting in our backyard, eating, drinking, soaking up the sun or being by the fire, under the stars. Since we didn't plan to sit on the ground (Obviously!), we needed to find a sitting area that would allow all of the things mentioned to come to fruition, and while finding a sitting area isn’t as hard as one might think, there was always one problematic question that we kept asking each other, “Why is outdoor furniture so expensive!?”

This is where that first sentence of a picture being worth something comes in. We decided, why not take a chance at building our ideal outdoor seating arrangement? Given the pandemic and the fact that a grocery store and Home Depot were the only places open, it seemed like we had the one thing that most DIY projects require, TIME! Alyssa, on one of her many Pinterest searches, came across a photo of an outdoor couch that looked like something out of a decor magazine (think very Restoration Hardware). Surely it had to be designed and manufactured by some high-end furniture designer, but alas, it was just a photo, and not even of the full couch for that matter. There was nothing we could even use as a reference point for materials, dimensions, let alone cost, and after looking over countless options, that one photo kept coming back to the forefront of our thoughts, so I (Dave) decided, let’s build our couch off that one photo.

After researching and YouTubing several DIY outdoor couch build projects, the thing we came to realize was, first and foremost, know, or decide, on the size of the cushions you want to use. While this may seem like the last step you would need to take, it is actually crucial one, as there is not a standard size cushion or better yet a standard size couch frame. Knowing the size of the cushions first allows you to then determine the rest of the supplies you need so that you can build the couch to fit the cushions, not the other way around (which you can leave you with cushions that don’t fit a couch or vice versa, extra building materials, not a big enough couch, etc.). It also saves you lots of money as you won’t have to get custom cushions made (unless, of course, you want to) to fit a couch that’s too big or too small. Knowing the cushion dimensions first allows you to build a couch that is just the right size.

You can find outdoor couch cushions at a variety of places and prices points, so it’s really about what you want color and design wise. For us, we knew we wanted simple, neutral, cream-colored cushions. We settled on these due not only to their look, but also their durability, measurements, and the fact that it was a 3-piece set that included the cushion backs (they’re no longer available, but I’ve linked some similar options at the bottom of this post). The seat cushions measured approximately 66 inches wide by 33 inches deep, so this was extremely helpful in that there would need to be minimal cuts for wood as we would be able to find planks of wood that would measure 6 ft (72 inches in length). Keeping it simple also applied to the back cushions as well. With the height of the back cushions coming in at just under 21 inches high and two of them making up the same width of the seat cushions, the backrest of the couch would be simple to put together.

With the cushion dimensions sorted, all that was left to do was to determine the remaining building materials that we would need. Oh, and of course, put the thing together.
Keep reading to find out all of the materials that we used and just how we built our own DIY outdoor couch for a small fraction of the cost of what it would be to buy something similar.

SUPPLIES
6 - 2-in x 12-in x 6 ft Douglas Fir board planks
3 - 4-in x 4-in x 10 ft common pressure treated beams (cut into 3 ft in length)
5 - 1 in. x 6 in. x 12 ft. Premium Kiln-Dried Square Edge Whitewood Common Board (cut into 6 ft in length)
5 - 1 in. x 6 in. x 4 ft. Premium Kiln-Dried Square Edge Whitewood Common Board (cut into 3 ft in length)
3 - 1.0 in. x 4.0 in. x 8 ft. Full Size Furring Strip Board (cut into 3 ft in length)
1 qt. Varathane Weathered Gray Premium Wood Stain
3 in. Chiseled Foam Paint Brush
1 box Grip-Rite #12-1/2 x 2 in. 6-Penny Hot-Galvanized Steel Box Nails (1 lb.-Pack)
1 box Grip-Rite #14 x 1-1/4 in. 3-Penny Bright Steel Smooth Shank Box Nails (1 lb.-Pack)
1 - Everbilt 4 in. Zinc Plated Mending Plates (2-Pack)
1 - handsaw

DIRECTIONS
At the hardware store, have an associate help you with some of the cuts of wood for the larger pieces of the couch base and back. This will help save you time at home and also if you don't have a proper table saw.
Now that you have all of your building materials, you can begin to assemble the couch, starting with the base. Since this is an L-shaped couch, both of the bases will be the same size and build, so you can replicate the process for the second base.
For the base, lay out 3 of the 3-foot long beams with even spacing between each beam, next lay 3 of the 6-foot pine planks across the top. Please note that the actual width of the planks, 12-inches, is not a true 12-inches, so there will be a little extra space on the beams sticking out. This is ok, as this will be helpful when attaching the back to the base.
Once you have the beams laid across the top of the beams, use the 2-inch nails to hammer and attach the planks to the beams.
Repeat these steps and process to build the second base.
For the back, lay down 3 of the 1”x4” boards that were cut into 3 ft in length. Then lay across the top 5 of the 1”x6” boards that were cut into 6 ft in length. Use the 1-1/4 in nails to hammer and attach. Again, there will be a little extra wood at the ends, that is ok and will be removed once assembled. Again keeping in line with the same method as the bases, you can replicate the same steps and process for the backs as well.
Once the backs are assembled, connecting and attaching them to the base is next. This is where the little extra on the beams on the base will come in handy. You will be able to rest the back on those beams of the base, and then use the 2-inch nails to hammer and attach the back into the base, by hammering the nails into the base plank.
If desired to secure the back further, use some of the smaller scraps to nail into the back and the bottom beams of the base.
The final piece of assembly will be the backing for the corner to seal off the backing for the L-couch. Use the same process as before for building the back, however, use the 1”x6” boards that were cut into 3 ft in length. Attach with nails
Lastly when each piece is fully assembled, slide both pieces together to form the L-shape. You can either choose to let each piece rest independently, or if you wish to connect both together, use the mending plates to link and attach both pieces together.
Now the couch has been assembled, the final step before laying out your cushions is applying the wood stain. Depending on how dark or weathered you want the wood to look will depend on how many coats you apply. For our couch, we applied 4 coats to give the wood a slightly darker and weathered finish, especially as the sun will eventually lighten the wood over time.
Once the stain has dried, lay out your cushions, pour yourself a drink and hit the proverbial “chill mode” button on life and enjoy.